
개요
애플리케이션 개발에 사용자 인증과 인가 등의 보안 기능은 거의 필수적으로 구현해야할 사항이다. 보통은 아이디와 비밀번호를 서버에 전달해 사용자를 인증하는 방법을 사용하는데, 스프링부트는 이걸 어떻게 처리할까? 쿠키나 세션 방식같은 방법이 있겠지만, 이번에는 JWT라는 토큰값을 활용하는 보안 기법으로 알아보려고 한다.
Spring Security
개념
- 스프링 시큐리티는 인증, 인가를 지원하고 주요 공격으로부터 어플리케이션을 보호해주는 프레임워크이다.
- 명령형과 리액티브 어플리케이션 모두에서 가장 잘 동작하는, 사실상 스프링 기반 어플리케이션의 표준 보안 프레임워크이다.
동작 원리
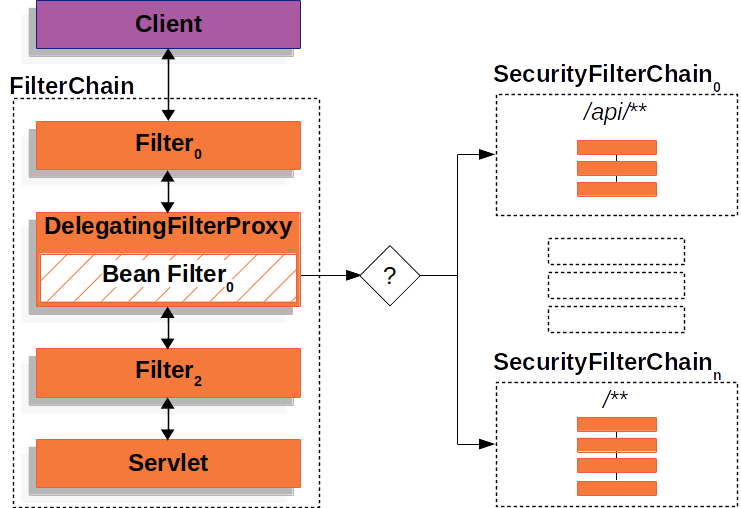
스프링 시큐리티는 클라이언트가 디스패처 서블릿에 접근 하기 전, 서블릿 필터 라는 필터 체인을 기반으로 동작한다. 요청은 이 필터를 처리되기 전에 한번, 처리 된 후에 다시 한번 거쳐 지나가게 된다.
이 필터 체인 역시 서블릿 컨테이너에서 관리하는데, 클라이언트에서 요청이 들어오면 서블릿 컨테이너는 URI를 확인해 필터와 서블릿을 매핑해준다.
스프링 시큐리티는 이 필터 체인 안의 필터 중 하나로, DelegatingFilterProxy 라는 자동 생성되는 빈을 통해 보안 필터의 프록시 객체를 필터 체인 안으로 집어넣어 동작시킨다.
인증 과정
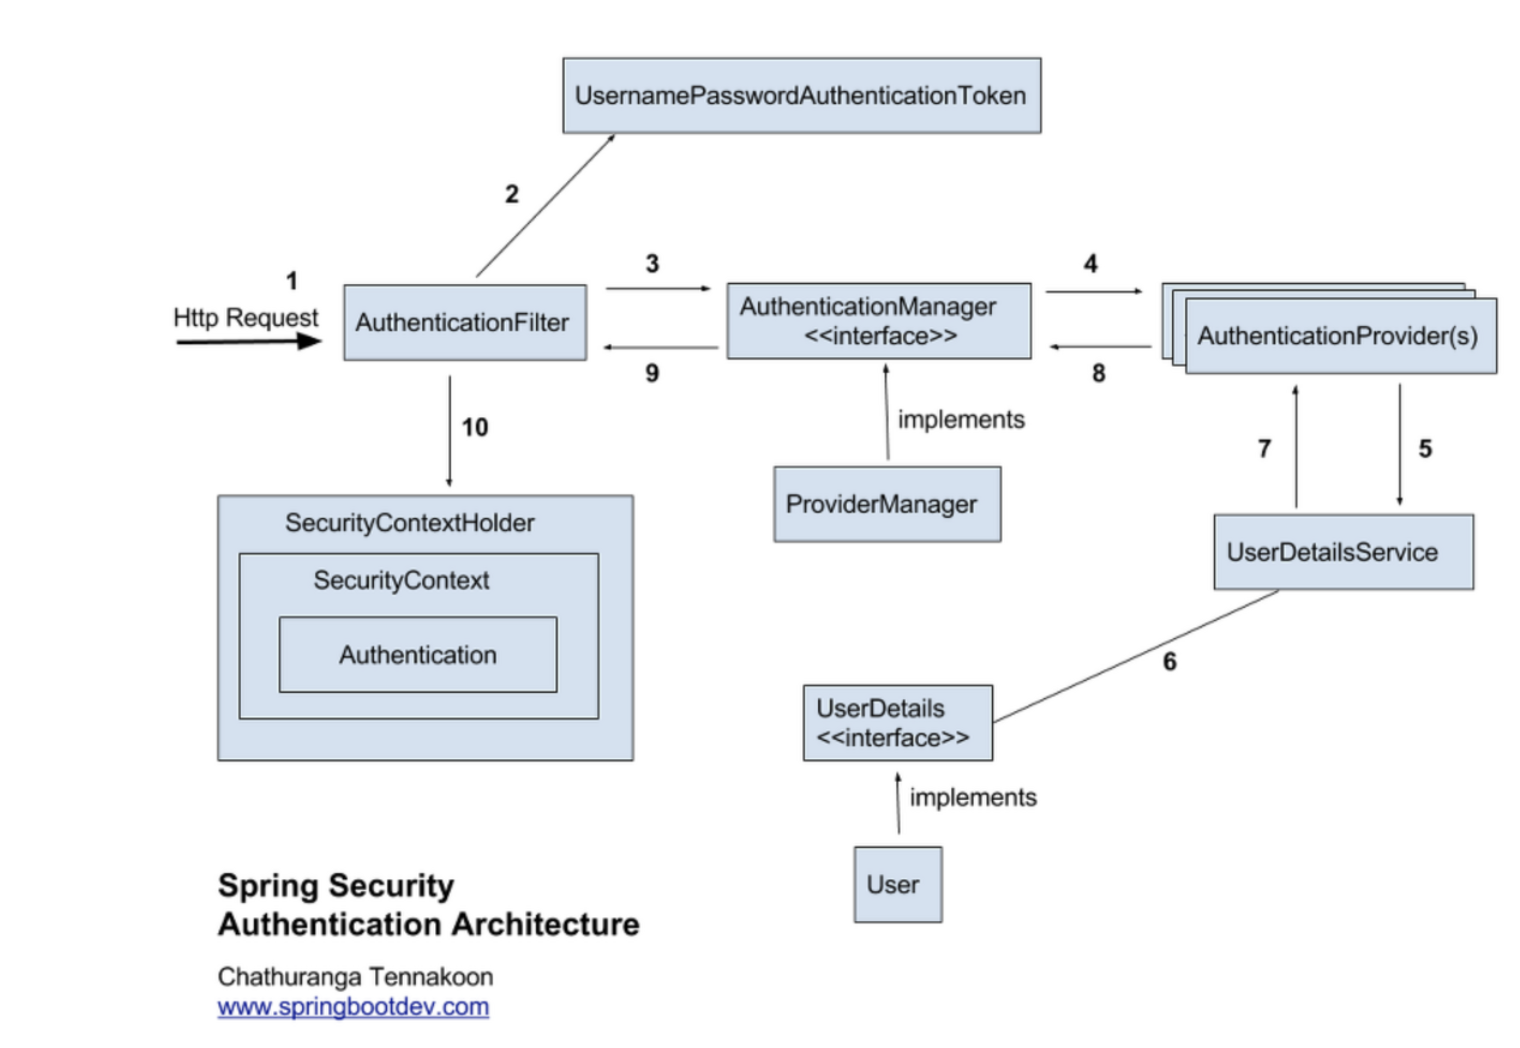
스프링 시큐리티 구조의 처리 과정을 간단히 설명하면 다음과 같다.
- 사용자가 로그인 정보와 함께 인증 요청을 한다.(Http Request)
- AuthenticationFilter가 요청을 가로채고, 가로챈 정보를 통해 UsernamePasswordAuthenticationToken의 인증용 객체를 생성한다.
- AuthenticationManager의 구현체인 ProviderManager에게 앞에서 생성한 객체를 전달한다.
- AuthenticationManager는 등록된 AuthenticationProvider(들)을 조회하여 인증을 요구한다.
- 실제 DB에서 사용자 인증정보를 가져오는 UserDetailsService에 사용자 정보를 넘겨준다.
- 넘겨받은 사용자 정보를 통해 DB에서 찾은 사용자 정보인 UserDetails 객체를 만든다.
- AuthenticationProvider(들)은 UserDetails를 넘겨받고 사용자 정보를 비교한다.
- 인증이 완료되면 권한 등의 사용자 정보를 담은 Authentication 객체를 반환한다.
- 다시 최초의 AuthenticationFilter에 Authentication 객체가 반환된다.
- Authenticaton 객체를 SecurityContext에 저장한다.
설정법
이전에는 WebSecurityConfidurerAdapter 클래스를 상속 받아 보안 필터 체인을 설정했었다. 하지만 현재 이 기능은 Deprecated 되어 사용이 불가능해졌고, 다음과 같이 SecurityFilterChain을 @Bean으로 등록해 사용해야 한다.
1
2
3
4
5
6
7
8
9
10
@Configuration
public class SecurityConfiguration {

    @Bean
    public SecurityFilterChain filterChain(HttpSecurity http) throws Exception {
        return http.authorizeRequests()
                .anyRequest().authenticated()
                .build();
    }
}
구체적인 설정법에 대해서는 뒤에 가서 알아보도록 하자.
JWT
JWT(JSON Web Token)는 당사자 간에 정보를 JSON 형태로 안전하게 전송하기 위한 토큰이다. JWT는 다음과 같은 특징이 있다.
- URL로 이용할 수 있는 문자열로만 구성돼 있다.
- 디지털 서명이 적용돼 있어 신뢰할 수 있다.
구조
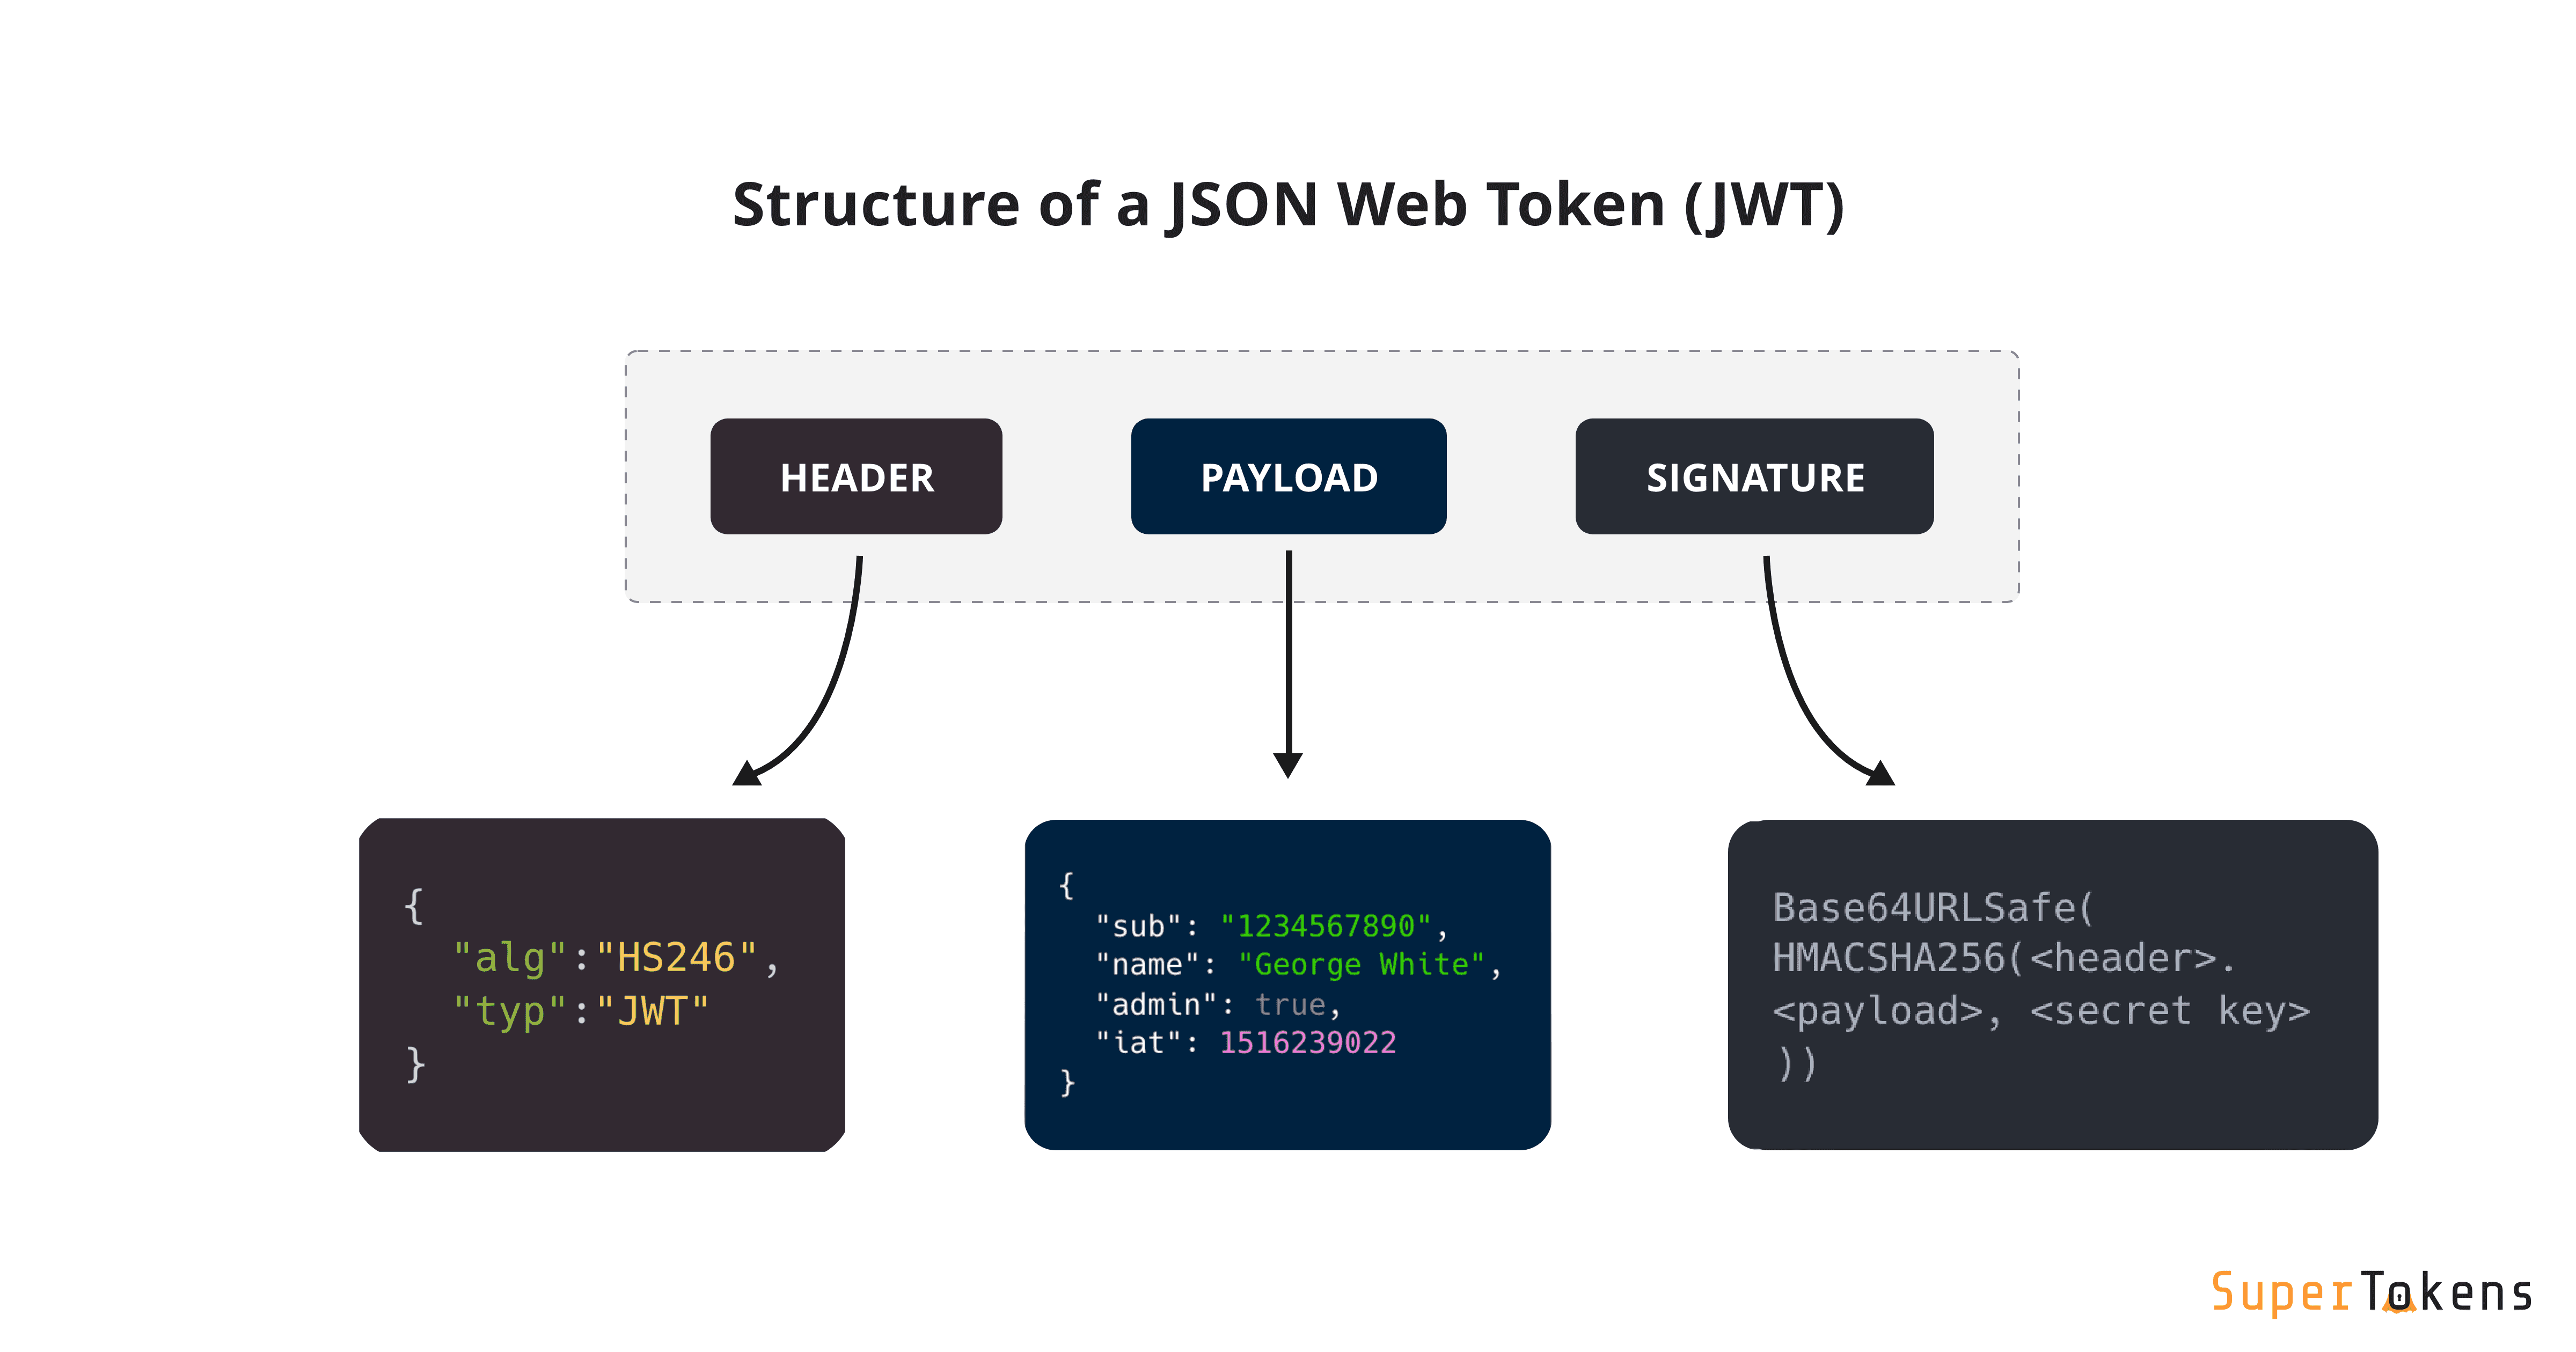
JWT는 헤더(Header), 내용(Payload), 서명(Signature) 각각의 부분이 Base64Url 형식으로 인코딩되어 .으로 구분지어진 구조를 가지고 있다.
헤더
JWT의 헤더는 검증과 관련된 내용을 담고 있다. 헤더에는 alg 와 typ, 두 가지 정보를 포함하고 있다.
1
2
3
4
{
    "alg": "H256",
    "typ": "JWT"
}
alg 에선 해싱 알고리즘을 지정한다. 해싱 알고리즘은 보통 SHA256 혹은 RSA를 사용하며, 코튼을 검증할 때 사용되는 서명 부분에서 사용된다. typ 에서는 토큰의 타입을 지정한다.
내용
1
2
3
4
5
{
    "sub": "board service payload",
    "exp": "1602076408",
    "userId": "TaemHam"
}
JWT 내용에는 토큰에 담는 정보를 포함한다. 이 정보를 클레임(Claim)이라 하고, 크게 세 가지로 분류된다.
- 등록된 클레임(Registered Claim) 등록된 클레임은 필수는 아니지만 토큰에 대한 정보를 담기 위해 이미 이름이 정해져 있는 클레임이다.
- iss: JWT 발금자 주체.
- sub: JWT의 제목.
- aud: JWT의 수신인.
- exp: JWT의 만료 시간. 형식은 NumericDate 형식이어야 한다.
- nbf: ‘Not Before’
- iat: JWT 발급 시간.
- jti: JWT의 식별자(JWT ID). 주로 중복 처리를 방지하기 위해 사용된다.
공개 클레임(Public Claim) 등록 클레임과 충돌이 발생하지 않는 선에서 마음대로 정할 수 있는 속성이다.
- 비공개 클레임(Private Claim) 비공개 클레임은 통신 간에 상호 합의된, 위의 두 클레임이 아닌 클레임이다.
서명
JWT의 서명 부분은 인코딩된 헤더, 인코딩된 내용, 비밀키, 헤더의 알고리즘 속성값을 가져와 생성된다. 예를 들어, HMAC SHA256 알고리즘을 사용해 서명을 생성하면 다음과 같이 생성된다.
1
2
3
4
5
HMACSHA256(
    base64UrlEncode(header) + "." +
    base64UrlEncode(payload),
    secret
    )
서명은 토큰의 값들을 포함해 암호화하기 때문에 메시지가 도중에 변경되지 않았는지 확인할 때 사용한다.
구현
- UserDetails와 UserDetailsService 구현체
1
2
3
4
5
6
7
8
9
10
11
12
13
14
15
16
17
18
19
20
21
22
23
24
25
26
27
28
29
30
31
32
33
34
35
36
37
38
39
40
41
42
43
44
45
46
47
48
49
50
51
52
53
54
55
56
57
58
59
60
61
62
63
64
65
66
67
68
@Getter
@AllArgsConstructor
public class CustomUserDetails implements UserDetails {

    private String username;
    private String password;
    private String email;
    private Collection<? extends GrantedAuthority> authorities;

    public static CustomUserDetails of(String username, String password, String email, UserRole role) {
        Set<UserRole> rollTypes = Set.of(role);

        return new CustomUserDetails(
                username,
                password,
                email,
                rollTypes.stream()
                        .map(UserRole::getName)
                        .map(SimpleGrantedAuthority::new)
                        .collect(Collectors.toUnmodifiableSet())
        );
    }

    // 엔티티에서 UserDto로, 다시 CustomUserDetails로 바꾸기 위한 메서드
    public static CustomUserDetails from(UserDto dto) {
        return CustomUserDetails.of(
                dto.getUsername(),
                dto.getPassword(),
                dto.getEmail(),
                dto.getRole()
        );
    }

    @Override
    public String getPassword() {
        return password;
    }

    @Override
    public String getUsername() {
        return username;
    }

    @Override
    public Collection<? extends GrantedAuthority> getAuthorities() {
        return authorities;
    }

    @Override
    public boolean isAccountNonExpired() {
        return true;
    }

    @Override
    public boolean isAccountNonLocked() {
        return true;
    }

    @Override
    public boolean isCredentialsNonExpired() {
        return true;
    }

    @Override
    public boolean isEnabled() {
        return true;
    }
}
CustomUserDetails 클래스는 UserDetails 인터페이스를 구현하고 있다. 위의 그림에서 설명했듯이, UserDetails는 UserDetailsService를 통해 입력된 로그인 정보를 가지고 데이터베이스에서 사용자 정보를 가져오는 역할을 수행한다.
1
2
3
4
5
6
7
8
9
10
@AllArgsConstructor
public class UserDetailsServiceImpl implements UserDetailsService {

    private final UserRepository userRepository;

    @Override
    public CustomUserDetails loadUserByUsername(String username) {
        return CustomUserDetails.from(UserDto.from(userRepository.findByUsername(username)));
    }
}
- JWTTokenProvider 구현
JWTTokenProvider는 UserDetails에서 정보를 추출해 JWT 토큰을 생성하는 클래스이다.
1
2
3
4
5
6
7
8
9
10
11
12
13
14
15
16
17
18
19
20
21
22
23
24
25
26
27
28
29
30
31
32
33
34
35
36
37
38
39
40
41
42
43
44
45
46
47
48
49
50
51
52
53
54
55
56
57
58
59
60
61
62
63
64
@Component
public class JwtTokenProvider {

    private final UserDetailsService userDetailsService;

    @Value("${springboot.jwt.secret}")
    private String secretKey = "secretKey";
    private final long TOKEN_VALID_MILLISECOND = 1000L * 60 * 60;

    @Autowired
    public JwtTokenProvider(UserDetailsService userDetailsService) {
        this.userDetailsService = userDetailsService;
    }


    @PostConstruct // Bean 으로 주입되면서 실행
    protected void init() {
        secretKey = Base64.getEncoder().encodeToString(secretKey.getBytes(StandardCharsets.UTF_8));
    }

    // 토큰 생성
    public String createToken(String username, Set<String> roles) {
        Claims claims = Jwts.claims().setSubject(username);
        claims.put("roles", roles);
        Date now = new Date();

        return Jwts.builder()
                .setClaims(claims)
                .setIssuedAt(now)
                .setExpiration(new Date(now.getTime() + TOKEN_VALID_MILLISECOND))
                .signWith(SignatureAlgorithm.HS256, secretKey)
                .compact();
    }

    // 토큰 인증 정보 조회
    public Authentication getAuthentication(String token) {
        UserDetails userDetails = userDetailsService.loadUserByUsername(this.getUsername(token));
        return new UsernamePasswordAuthenticationToken(userDetails, "", userDetails.getAuthorities());
    }

    // 토큰 기반 회원 구별 정보 추출
    public String getUsername(String token) {
        return Jwts.parser()
                .setSigningKey(secretKey)
                .parseClaimsJws(token)
                .getBody()
                .getSubject();
    }

    // HTTP 헤더에서 Token 값 추출
    public String resolveToken(HttpServletRequest request) {
        return request.getHeader("X-AUTH-TOKEN");
    }

    // 토큰 유효성 체크
    public boolean validateToken(String token) {
        try {
            Jws<Claims> claims = Jwts.parser().setSigningKey(secretKey).parseClaimsJws(token);
            return !claims.getBody().getExpiration().before(new Date());
        } catch (Exception e) {
            return false;
        }
    }
}
- JWTAuthenticationFilter 구현
JWTAuthenticationFilter는 헤더로 받은 JWT 토큰을 추출해 유효성을 검사하고, SecurityContextHolder에 Authentication을 부여하는 클래스이다.
1
2
3
4
5
6
7
8
9
10
11
12
13
14
15
16
17
18
19
20
21
22
23
24
public class JwtAuthenticationFilter extends OncePerRequestFilter {

    private final JwtTokenProvider jwtTokenProvider;

    @Autowired
    public JwtAuthenticationFilter(JwtTokenProvider jwtTokenProvider) {
        this.jwtTokenProvider = jwtTokenProvider;
    }

    @Override
    protected void doFilterInternal(HttpServletRequest request, HttpServletResponse response, FilterChain filterChain)
            throws ServletException, IOException {
        // 토큰 추출
        String token = jwtTokenProvider.resolveToken(request);

        // 토큰 유효성 체크
        if (token != null && jwtTokenProvider.validateToken(token)) {
            Authentication authentication = jwtTokenProvider.getAuthentication(token);
            SecurityContextHolder.getContext().setAuthentication(authentication);
        }

        filterChain.doFilter(request, response);
    }
}
- SecurityConfiguration 구현
JWT를 사용하는 SecurityFilterChain은 다음과 같이 구현한다.
1
2
3
4
5
6
7
8
9
10
11
12
13
14
15
16
17
18
19
20
21
22
23
24
25
26
27
28
29
30
31
32
33
34
35
36
37
38
39
40
41
42
43
44
45
46
47
48
49
50
@RequiredArgsConstructor
@Configuration
public class SecurityConfiguration {

    private final JwtTokenProvider jwtTokenProvider;
    private final JwtAccessDeniedHandler jwtAccessDeniedHandler;
    private final JwtAuthenticationEntryPoint jwtAuthenticationEntryPoint;

    // 필터체인을 통과시키지 않을 URI 설정
    @Bean
    public WebSecurityCustomizer webSecurityCustomizer(){
        return (web) -> web.ignoring()
                .antMatchers("/favicon.ico");
    }

    // 필터체인 설정
    @Bean
    public SecurityFilterChain filterChain(HttpSecurity httpSecurity) throws Exception {
        return httpSecurity

                // token을 사용하는 방식이기 때문에 csrf를 disable한다.
                .csrf().disable()

                // 세션을 사용하지 않기 때문에 STATELESS로 설정
                .sessionManagement()
                .sessionCreationPolicy(SessionCreationPolicy.STATELESS)

                .and()

                // 각 URI 인증 여부 결정
                .authorizeRequests()
                .antMatchers("/api/v1/sign-in", "/api/v1/sign-up").permitAll() // 허용 경로
                .antMatchers(HttpMethod.GET, "/api/v1/article").permitAll() // GET 방식만 허용
                .antMatchers("/api/v1/user-info").hasRole("ADMIN") // Role이 ADMIN 이어야 함
                .anyRequest().authenticated() // 나머지 경로는 JWT 인증 필요

                .and()

                // 예외 전달 설정 (설명은 이후에 추가)
                .exceptionHandling()
                .authenticationEntryPoint(jwtAuthenticationEntryPoint) // 커스텀 엔트리포인트
                .accessDeniedHandler(jwtAccessDeniedHandler) // 커스텀 인가 실패 핸들링

                .and()

                // JwtAuthenticationFilter 적용
                .addFilterBefore(new JwtAuthenticationFilter(jwtTokenProvider), UsernamePasswordAuthenticationFilter.class)
                .build();
    }
}
WebSecurityCustomizer 는 필터체인의 앞단에 적용되며, 전체적으로 스프링 시큐리티 영향권의 밖에 있는 필터이다. 때문에 인증과 인가가 적용되지 않는 리소스 접근에 대해 사용할 수 있다. “favicon.ico” 외에도, Swagger 를 사용한다면 “/v2/api-docs”, “/swagger-resource/**”, “/swagger-ui.html”, “webjars/**“를, h2 DB를 사용한다면 “/h2/**” 를 추가하기도 한다.
SecurityFilterChain 를 빈으로 등록해 필터체인을 설정한다. 다음은 각각의 필터에 대한 설명이다.
csrf().disable(): 스프링 시큐리티의 csrf() 메서드는 기본적으로 CSRF 토큰을 발급해 클라이언트로부터 요청을 받을 때마다 토큰을 검사하는 방식으로 진행한다. REST API 에서는 CSRF 보안이 필요 없기 때문에 비활성화 하는 로직이다.
sessionManagement().sessionCreationPolicy(SessionCreationPolicy.STATELESS): REST API 기반 애플리케이션의 동작 방식을 설정한다. JWT 토큰으로 인증을 처리하며 세션은 사용하지 않기 때문에 STATELESS로 설정하는 로직이다.
authorizeRequests(): 애플리케이션에 들어오는 요청에 대한 사용 권한을 체크한다. ansMatchers()로 URI별 설정을 하고, 나머지에 대해선 anyRequest()로 설정한다. permitAll()은 해당 요청을 모두 허용한다는 것,hasRole(“[권한]”)은 특정 권한에 대해서만 허용한다는 것, 그리고 authenticated()는 인증된 권한을 가진 사용자에게만 허용한다는 것이다.
exceptionHandling().authenticationEntryPoint(jwtAuthenticationEntryPoint): 인증 과정에서 예외가 발생한 경우 예외를 전달한다.
exceptionHandling().accessDeniedHandler(jwtAccessDeniedHandler): 권한을 확인하는 과정에서 통과하지 못하는 예외가 발생할 경우 예외를 전달한다.
- 커스텀 AccessDeniedHandler, AuthenticationEntryPoint
1
2
3
4
5
6
7
8
9
@Component
public class JwtAccessDeniedHandler implements AccessDeniedHandler {

    @Override
    public void handle(HttpServletRequest request, HttpServletResponse response,
        AccessDeniedException exception) throws IOException {
            response.sendRedirect("/exception");
        }
}
AccessDeniedException 은 액세스 권한이 없는 리소스에 접근할 경우 발생하는 예외이다. 이 예외를 처리하기 위해 AccessDeniedHandler 인터페이스가 사용되고, 앞의 SecurityConfiguration에서도 exceptonHandling() 메서드를 통해 추가했다. 위의 예제는 예외 발생시 “/exception”으로 리다이렉트 되도록 sendRedirect() 메서드를 활용하는 방식으로 구현되었다.
1
2
3
4
5
6
7
8
9
10
11
12
13
14
15
16
17
18
19
20
21
22
23
@Component
public class JwtAuthenticationEntryPoint implements AuthenticationEntryPoint {

    @Override
    public void commence(HttpServletRequest request, HttpServletResponse response,
        AuthenticationException exception) throws IOException {
        ObjectMapper objectMapper = new ObjectMapper();

        EntryPointErrorResponse entryPointErrorResponse = new EntryPointErrorResponse("인증이 실패하였습니다.");
        response.setStatus(401);
        response.setContentType("application/json");
        response.setCharacterEncoding("utf-8");
        response.getWriter().write(objectMapper.writeValueAsString(entryPointErrorResponse));
    }
}

///
@Getter
@AllArgsConstructor
@ToString
public class EntryPointErrorResponse {
    private String message;
}
AuthenticationEntryPoint의 구조는 앞의 AccessDeniedHandler와 크게 다르지 않고, commence() 메서드를 오버라이딩 해 구현한다. 위의 예제는 예외 처리를 위해 직접 Response를 생성해 클라이언트에게 응답하는 방식으로 구현되었다. 만약 메시지를 설정할 필요가 없다면, 다음과 같이 response.sendError() 메서드로 인증 실패 코드만 전달할 수 있다.
1
2
3
4
5
6
7
//...
    @Override
        public void commence(HttpServletRequest request, HttpServletResponse response,
            AuthenticationException exception) throws IOException {
            response.sendError(HttpServletResponse.SC_UNAUTHORIZED)
        }
//...
회원 가입과 로그인 기능의 컨트롤러와 서비스등 위의 구현 내용을 이어붙이는 것이기 때문에, 밑의 나머지 부분에 넣어 놓고 넘어가겠다.