

개요
지금까지 공부해왔던 웹 API는 클라이언트에서 데이터가 필요하면, 서버 하나에서 응답에 필요한 데이터를 지지고 볶아 내어주는 “모놀리식 아키텍처(Monolithic Architecture)” 로 구현해왔다. 하지만 최근에 개발되는 서비스들은 서로 다른 데이터를 처리하는 서버를 여러 개 두고 서버끼리 통신해 데이터를 만들어나가는 “마이크로서비스 아키텍처(Microservice Architecture)”를 주로 채택하고 있다. 그렇다는 것은 클라이언트에서 서버로 요청을 보내는 것 뿐만이 아니라 서버에서 서버로 요청을 보낼 수 있어야 한다는 말인데, 이런 웹 요청은 어떻게 자바 코드로 보낼 수 있을까? 스프링부트는 RestTemplate, WebClient를 통해 다른 서버로 웹 요청을 보내고 응답을 받을 수 있게 도와준다.
Rest Template
개념
- RestTemplate은 스프링에서 HTTP 통신 기능을 손쉽게 사용하도록 설계된 템플릿이다.
- HTTP 서버와의 통신을 단순화해 RESTful 원칙을 지키는 서비스를 편하게 만들 수 있다.
특징
- 이름처럼 RESTful 형식을 갖춘 템플릿
- JSON, XML, 문자열 등 다양한 형식의 응답 제공
- 블로킹(blocking) I/O 기반의 동기 방식을 사용
- HTTP 프로토콜의 메서드에 맞는 여러 메서드를 제공
- 현재는 지원 중단(deprecated)된 상태로 WebClient 방식을 사용하는걸 추천하나, 현업에서는 아직 많이 사용됨
동작 원리
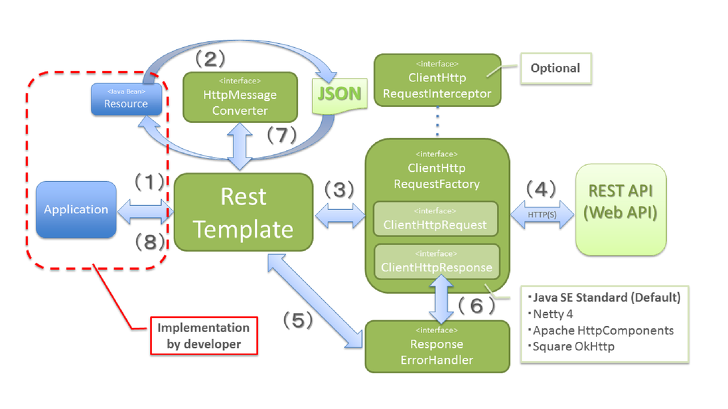
위 그림의 왼쪽 파란 사각형이 우리가 작성하는 애플리케이션 코드이고, 오른쪽 끝의 REST API가 다른 서버에 존재하는 API 이다. 여기서 RestTemplate 메서드를 호출하면 그 둘 사이에서 무슨 일이 일어나는지 알아보자.
어플리케이션이 RestTemplate를 생성하고, URI, HTTP 메소드 등의 헤더를 담아 요청
RestTemplate는 HttpMessageConverter를 사용하여 requestEntity를 요청 메세지로 변환
RestTemplate는 ClientHttpRequestFactory로 부터 ClientHttpRequest를 가져와서 요청을 보냄
ClientHttpRequest 는 요청메세지를 만들어 HTTP 프로토콜을 통해 서버와 통신
RestTemplate 는 ResponseErrorHandler 로 오류를 확인하고 있다면 처리로직을 실행
ResponseErrorHandler 는 오류가 있다면 ClientHttpResponse 에서 응답데이터를 가져와서 처리
RestTemplate 는 HttpMessageConverter 를 이용해서 응답메세지를 java object(Class responseType) 로 변환
어플리케이션에 반환
메서드 종류
| 메서드 | HTTP 형태 | 설명 |
|---|---|---|
| getForObject | GET | GET 형식으로 요청한 결과를 객체로 반환 |
| getForEntity | GET | GET 형식으로 요청한 결과를 ResponseEntity로 반환 |
| postForLocation | POST | POST 형식으로 요청한 결과를 헤더에 저장된 URI로 반환 |
| postForObject | POST | POST 형식으로 요청한 결과를 객체로 반환 |
| postForEntity | POST | POST 형식으로 요청한 결과를 ResponseEntity로 반환 |
| delete | DELETE | DELETE 형식으로 요청 |
| put | PUT | PUT 형식으로 요청 |
| patchForObject | PATCH | PATCH 형식으로 요청한 결과를 객체로 반환 |
| optionsForAllow | OPTION | 해당 URI에서 지원하는 HTTP 메서드를 조회 |
| exchange | any | HTTP 헤더를 임의로 추가할 수 있고, 어떤 메서드 형식에서도 사용할 수 있음 |
| execute | any | 요청과 응담에 대한 콜백을 수정 |
구현
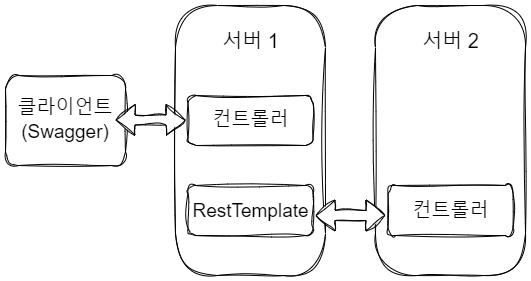
클라이언트가 서버1에게 요청을 보내면, 서버1은 RestTemplate을 사용해 서버2의 REST API를 호출하는 형식으로 구현해보았다.
- 서버2 컨트롤러
서버2는 API가 호출당하는 서버다. 웹 서비스라면 컨트롤러 이외에도 여러 계층이 존재하겠지만, 간단히 테스트 하기 위해 컨트롤러만 작성했다.
1
2
3
4
5
6
7
8
9
10
11
12
13
14
15
16
17
18
19
20
21
22
23
24
25
26
27
28
29
30
31
32
33
34
35
36
37
38
39
40
41
42
@RestController
@RequestMapping("api/v1/test") // application.properties 를 통해 포트 9090 할당
public class Server2Controller {

    // 아무것도 추가 안된 GET 메서드
    @GetMapping
    public String getSomething() {
        return "Something";
    }

    // PathVariable을 받는 GET 메서드
    @GetMapping(value = "/{variable}")
    public String doSomethingWithPathVariable(@PathVariable String variable) {
        return variable;
    }

    // RequestParam을 받는 GET 메서드
    @GetMapping("/param")
    public String doSomethingWithParam(@RequestParam String parameter) {
        return parameter;
    }

    // RequestBody를 받는 POST 메서드
    @PostMapping
    public ResponseEntity<Dto> getDto(
            @RequestBody RequestDto requestDto
    ) {
        Dto dto = new Dto(); // name과 email에 대한 getter, setter만 존재하는 DTO
        dto.setName(requestDto.getName());
        dto.setEmail(requestDto.getEmail());
        return ResponseEntity.status(HttpStatus.OK).body(dto);
    }

    // RequestHeader 로 HTTP 헤더를 받는 POST 메서드
    @PostMapping(value = "/header")
    public ResponseEntity<Dto> doSomethingWithHeader(
        @RequestHeader("my-header") String header,
        @RequestBody RequestDto requestDto
    ) {
        return ResponseEntity.status(HttpStatus.OK).body(requestDto);
    }
}
- 서버1 컨트롤러
Postman으로 클라이언트 측에서 요청을 보내는 것 처럼 하기 위해 간략히 작성한 컨트롤러이다.
1
2
3
4
5
6
7
8
9
10
11
12
13
14
15
16
17
18
19
20
21
22
23
24
25
26
27
28
29
30
31
32
33
@RestController
@RequestMapping("/rest-template")
@AllArgsConstructor
public class Server1Controller {

    private final Server1Service server1Service;

    @GetMapping
    public String getSomething() {
        return server1Service.getSomething();
    }

    @GetMapping("/path-variable")
    public String doSomethingWithPathVariable() {
        return server1Service.doSomethingWithPathVariable();
    }

    @GetMapping("/parameter")
    public String doSomethingWithParam() {
        return server1Service.doSomethingWithParam();
    }

    @PostMapping
    public ResponseEntity<Dto> postWithBody() {
        return server1Service.postWithBody();
    }

    @PostMapping("/header")
    public ResponseEntity<Dto> postWithHeader() {
        return server1Service.postWithHeader();
    }

}
- 서버1 서비스
서비스 계층에서 RestTemplate 을 사용해 서버2의 API를 호출하도록 작성했다. RestTemplate을 생성해 사용하는 방법은 여러가지가 있는데, 그 중 가장 보편적으로 사용하는 것은 UriComponentsBuilder이다. UriComponentsBuilder는 스프링 프레임워크에서 제공하는 클래스로, 여러 파라미터를 연결해서 URI 형식으로 만드는 기능을 수행한다.
1
2
3
4
5
6
7
8
9
10
11
12
13
14
15
16
17
18
19
20
21
22
23
24
25
26
27
28
29
30
31
32
33
34
35
36
37
38
39
40
41
42
43
44
45
46
47
48
49
50
51
52
53
54
55
56
57
58
59
60
61
62
63
64
65
66
67
68
69
70
71
72
73
74
75
76
77
78
79
80
81
82
83
84
85
86
87
88
89
90
91
92
93
94
95
@Service
public class Server1Service {

    // GET 형식의 RestTemplate

    // 1. PathVariable 이나 파라미터를 사용하지 않는 호출 방법
    public String getSomething() {
        URI uri = UriComponentsBuilder
                .fromUriString("http://localhost:9090")
                .path("/api/v1/test")
                .encode() // 인코딩 문자셋, 디폴트는 UTF-8
                .build()
                .toUri();

        RestTemplate restTemplate = new RestTemplate();
        ResponseEntity<String> responseEntity = restTemplate.getForEntity(uri, String.class);

        return responseEntity.getBody();
    }

    // 2. PathVariable을 사용한 호출 방법
    public String doSomethingWithPathVariable() {
        URI uri = UriComponentsBuilder
                .fromUriString("http://localhost:9090")
                .path("/api/v1/test/{variable}") // path 에서 중괄호를 사용해 변수명을 입력
                .encode()
                .build()
                .expand("foobar") // expand 에서 순서대로 값 입력 (복수의 값을 넣어야 할 경우 쉼표(,)로 추가)
                .toUri();

        RestTemplate restTemplate = new RestTemplate();
        ResponseEntity<String> responseEntity = restTemplate.getForEntity(uri, String.class);

        return responseEntity.getBody();
    }

    // 3. 파라미터를 사용한 호출 방법
    public String doSomethingWithParameter() {
        URI uri = UriComponentsBuilder
                .fromUriString("http://localhost:9090")
                .path("/api/v1/test/param")
                .queryParam("parameter", "foobaz")
                .encode()
                .build()
                .toUri();

        RestTemplate restTemplate = new RestTemplate();
        ResponseEntity<String> responseEntity = restTemplate.getForEntity(uri, String.class);

        return responseEntity.getBody();
    }

    // POST 형식의 RestTemplate

    // 1. RequestBody를 넣는 호출 방법
    public ResponseEntity<Dto> postWithBody() {

        URI uri = UriComponentsBuilder
                .fromUriString("http://localhost:9090")
                .path("/api/v1/test")
                .encode()
                .build()
                .toUri();

        Dto dto = new Dto();
        dto.setName("name");
        dto.setEmail("email@mail.com");

        RestTemplate restTemplate = new RestTemplate();
        return restTemplate.postForEntity(uri, dto, Dto.class);
    }

    // 2. Header를 넣는 호출 방법
    public ResponseEntity<MemberDto> postWithHeader() {

        URI uri = UriComponentsBuilder
                .fromUriString("http://localhost:9090")
                .path("/api/v1/test/header")
                .encode()
                .build()
                .toUri();

        Dto dto = new Dto();
        dto.setName("name");
        dto.setEmail("email@mail.com");

        RequestEntity<MemberDto> requestEntity = RequestEntity
                .post(uri)
                .header("my-header", "barbaz")
                .body(dto);

        RestTemplate restTemplate = new RestTemplate();
        return restTemplate.exchange(requestEntity, Dto.class);
    }
}
WebClient
개념
WebClient 역시 웹 요청을 수행하기 위해 사용되는 인터페이스이다.
특징
- 싱글 스레드 방식
- 논블로킹(Non-Blocking) IO
- 리액티브 스트림(Reactive Streams)의 백 프레셔를 지원
- 함수형 API 지원 (AWS 람다)
- 동기, 비동기 상호작용 지원
- 스트리밍 지원
구현
- pom.xml
WebClient를 사용하려면 WebFlux 모듈에 대한 의존성을 추가해야 한다.
1
2
3
4
<dependency>
    <groupId>org.springframework.boot</groupId>
    <artifactId>spring-boot-starter-webflux</artifactId>
</dependency>
- 서버1 서비스
위의 서비스 코드에서 WebClient를 사용하도록 수정해 본 코드이다.
1
2
3
4
5
6
7
8
9
10
11
12
13
14
15
16
17
18
19
20
21
22
23
24
25
26
27
28
29
30
31
32
33
34
35
36
37
38
39
40
41
42
43
44
45
46
47
48
49
50
51
52
53
54
55
56
57
58
59
60
61
62
63
64
65
66
67
68
69
70
71
72
73
74
75
76
77
78
79
80
81
82
83
84
85
86
87
88
89
90
91
92
@Service
public class Server1Service {

    // GET 형식의 WebClient

    // 1. PathVariable 이나 파라미터를 사용하지 않는 호출 방법 (builder() 방식 사용)
    public String getSomething() {
        WebClient webClient = WebClient.builder() // 빌더 호출 후 메서드로 확장
        .baseUrl("http://localhost:9090")
        .defaultHeader(HttpHeaders.CONTENT_TYPE, MediaType.APPLICATION_JSON_VALUE)
        .build();

        return webClient.get()
        .uri("/api/v1/test")
        .retrieve()
        .bodyToMono(String.class) // 리턴타입 설정 (Mono란 데이터를 제공하는 발행자)
        .block(); // 기본적으로 논블로킹으로 동작하므로, block() 을 통해 블로킹으로 전환
    }

    // 2. PathVariable을 사용한 호출 방법 (create() 방식 사용)
    public String doSomethingWithPathVariable() {
        WebClient webClient = WebClient.create("http://localhost:9090"); // 객체 생성 후

        ResponseEntity<String> responseEntity = webClient.get()
            .uri(uriBuilder -> uriBuilder.path("/api/v1/test/{variable}")
                .build("foobar"))
            .retrieve() // 요청에 대한 응답값 추출
            .toEntity(String.class) // ResponseEntity 타입으로 받을 수 있음
            .block();

        return responseEntity.getBody()
    }

    // 3. 파라미터를 사용한 호출 방법
    public String doSomethingWithParameter() {
        WebClient webClient = WebClient.create("http://localhost:9090");

        return webClient.get().uri(uriBuilder -> uriBuilder.path("/api/v1/test/param")
            .queryParam("parameter", "foobaz")
                .build())
            .exchangeToMono(clientResponse -> { // exchange는 응답 결과 코드에 따라 다르게 응답을 설정하고 싶을 때 사용 가능
                if (clientResponse.statusCode().equals(HttpStatus.OK)) {
                    return clientResponse.bodyToMono(String.class);
                return clientResponse.createException().flatMap(Mono::error);
                }
            })
            .block();
    }

    // POST 형식의 RestTemplate

    // 1. RequestBody를 넣는 호출 방법
    public ResponseEntity<Dto> postWithBody() {

        WebClient webClient = WebClient.builder()
        .baseUrl("http://localhost:9090")
        .defaultHeader(HttpHeaders.CONTENT_TYPE, MediaType.APPLICATION_JSON_VALUE)
        .build();

        Dto dto = new Dto();
        dto.setName("name");
        dto.setEmail("email@mail.com");

        return webClient.post()
            .uri("/api/v1/test")
            .bodyValue(dto) // bodyValue로 post와 함께 전송할 body 값 추가
            .retrieve()
            .toEntity(Dto.class) // Dto로 추출
            .block();
    }

    // 2. Header를 넣는 호출 방법
    public ResponseEntity<MemberDto> postWithHeader() {

        WebClient webClient = WebClient.builder()
        .baseUrl("http://localhost:9090")
        .defaultHeader(HttpHeaders.CONTENT_TYPE, MediaType.APPLICATION_JSON_VALUE)
        .build();

        Dto dto = new Dto();
        dto.setName("name");
        dto.setEmail("email@mail.com");

        return webClient.post()
            .uri("/api/v1/test")
            .header("my-header", "barbaz") // header 로 헤더 추가
            .bodyValue(dto)
            .retrieve()
            .toEntity(Dto.class)
            .block();
    }
}
먼저 WebClient 객체를 생성한다. WebClient는
.builder()와.create(), 두 가지 방법으로 생성할 수 있다.create 방식은 기본 설정값으로 객체를 생성하지만, builder 방식은 빌더 패턴으로 작동해 설정값을 직접 넣어줄 수 있다.
builder 사용법은
.baseUrl()메서드에서 기본 URL을 설정한 후 다음과 같은 메서드들을 통해 확장한다:.defaultHeader(): 기본 헤더 설정.defaultCookie(): 기본 쿠키 설정.defaultUriVariable(): 기본 URI 확장값 설정.filter(): WebClient에서 발생하는 요청에 대한 필터 설정
생성된 객체에서 요청에 사용할 HTTP 메서드에 따라
.get(),.post(),.put(),.delete()를 호출한다.다음 uri 메서드로 접근하고자 하는 URI를 설정한다. 기본적으로 String 형식으로 입력 할 수 있지만, uriBuilder를 사용해 전달할 수도 있다.
응답 결과를 가져오는 방법도
.retrieve()와.exchange()가 있다. retrieve 를 이용하면 바로 ResponseBody를 처리 할 수 있지만, exchange 를 이용하면 응답 코드에 따른 결괏값을 다르게 설정하는 등 세세한 컨트롤이 가능하다.가져온 응답 결과에
.toEntity()를 호출해 어떤 타입으로 변환할지 정한다.만약 블로킹 구조로 동작하게 하려면
.block()메서드를 추가해주면 된다.